
Engineering Design for 4th Grade: Design a Safer Railroad Crossing
A three-session 4th grade engineering design challenge. Starting from the railroad crossing on page 14 of the picture book, groups define criteria and a 15 track dollar budget, sketch and score two designs, build a model crossing, run fair tests, find the failure point, improve, retest and present.
- Grade
- 4th Grade
- Subjects
- Engineering design, Science, Safety
- Time
- Three sessions: 45, 50 and 40 minutes
- Structure
- Engineering design challenge over three sessions
- Prep
- 30 minutes: on each group table, tape two parallel lines as a track and an 8 cm paper walking path across it; stock a supply table with craft sticks, index cards, string, paper cups, foil, red and yellow paper, tape and small bells or paper clip rattles; tape a mark on the floor 3 meters from the front and 3 meters from the side of each group table; copy the three printables; flag page 14
- Grouping
- Whole class for Ask and Share, groups of three or four for planning, building and testing
- Book
- Page 14
- NGSS 3-5-ETS1-1
- NGSS 3-5-ETS1-2
- NGSS 3-5-ETS1-3
 Need the book? Get the paperback on Amazon (opens in a new tab) or earn a free classroom copy.
Days 9-11 of the 4th Grade train unit
Builds on: Days 7 and 8 (4D) showed that a faster object has more energy, and a real train is fast and enormous, so it needs a long distance to stop. A crossing has to warn people early for exactly that reason.
Leads to: Days 12 and 13 (4F) look at what trains carry and why towns wanted railroads in the first place.
Learning objective
Students define a crossing design problem with criteria and constraints (materials, time and cost), sketch and compare two possible solutions with a scoring chart, build a model, run fair tests with controlled variables, and use failure points to improve the design.
I can define a design problem with criteria and constraints, compare two designs, and use fair tests to find what to improve.
Vocabulary to teach
Materials
- Rally Takes the Train by Kelsey Lizee Cecil: get the paperback on Amazon (opens in a new tab) or earn a free classroom copy
- Per group: a masking tape track and an 8 cm paper walking path on the table, a cardboard base, a ruler, and a stopwatch or timer
- Supply table: craft sticks, index cards, string, paper cups, foil squares, red and yellow paper, tape, and a few small bells (or paper clips in a cup that rattle)
- Tape marks on the floor 3 meters from the front and side of each group table, and a meter stick to place them
- Design Brief printable (one per student, Day 1): the problem, a criteria and constraints chart and the track dollar price list
- Compare Designs printable (one per student, Day 1): two sketch boxes and a scoring chart
- Fair Test and Improve printable (one per student, Days 2 and 3): test table, failure point and retest lines
- Optional: the Southern California Railway Museum guide (rallytakesthetrain.com/museums/southern-california-railway-museum-perris)
Before you teach
- Decide groups of three or four before Day 1 and keep them for all three sessions.
- Build a quick, imperfect sample gate yourself so you know how long the build takes, but do not show it: students should not copy it.
- Store each group's prototype on a labeled tray between sessions.
- Plan the observer swap for Day 2: each group sends one member to observe for the group on its left. Nobody judges their own model, and every model gets an observer who has not seen it before.
Lesson plan
Engineering design challenge over three sessions. The three 3-5-ETS1 expectations ask for defining a problem, comparing solutions, and fair testing to find what to improve. Each needs real time, and the improve-and-retest step is the one that disappears when a design challenge is squeezed into one period.
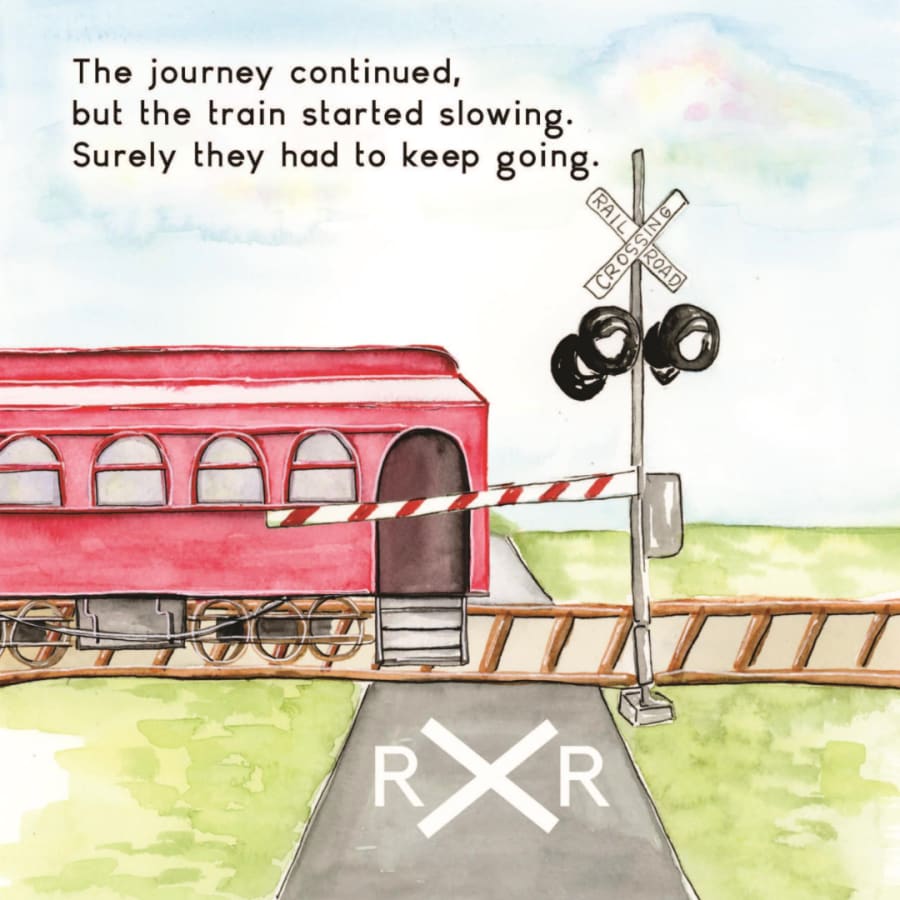
Using the book: On Day 1, show page 14 for about 2 minutes during Ask: students name every warning in the painting (lights, crossbuck sign, gate, RXR on the road).
Day 1 45 minutes
- Show page 14. Students name every warning in the painting: flashing lights, the crossbuck sign, the red and white gate, RXR on the road. Ask why there are so many instead of one.
- Present the problem: at a park or museum with a small working railroad, visitors (including small children) walk across the track to reach the picnic area. Design a model crossing that warns walkers and blocks the path when a train is coming.
- Teach criteria and constraints directly. Build the criteria list together: seen from 3 meters, front and side; noticed by someone not looking; gate blocks the whole 8 cm path; gate down and up in 5 seconds, three times in a row.
- Constraints: supply table materials only, 20 minutes to build, 15 track dollars. Students copy both lists onto the Design Brief.
Look for: Students who connect a warning that makes sound to someone who is not looking.
- Each student sketches one idea alone for 4 minutes.
- Groups share sketches and combine them into two clearly different designs, Design A and Design B, drawn and labeled on the Compare Designs page.
Look for: Two designs that are actually different (sound vs light, swing gate vs drop gate), not one design drawn twice.
- Groups score each design 0, 1 or 2 on every criterion and on cost, then total the scores.
- They choose one design and write two reasons that refer to the scores.
- Groups list the materials they will buy and check the total against 15 track dollars on the Design Brief.
- Collect the pages in the group tray.
Day 2 50 minutes
- Groups buy their materials from the supply table with their plan and record what they spent (3 minutes).
- Build for 20 minutes. Call time warnings at 10 and 5 minutes.
- Clean up scraps and put the prototype on the tray (2 minutes).
Look for: Groups that go over budget; ask what they will give up instead of handing out more.
- Visibility: the observer stands on the 3 meter mark, front then side, three trials each.
- Notice test: the observer faces away reading a card while the warning starts, three trials.
- Gate test: lower and raise the gate three times, timing each cycle. Record every result right away.
- Remind the class that the distance, the observer position and the timer stay the same for every group; only the design changes.
- Groups circle the test that went worst and write where or when the model stopped working.
Day 3 40 minutes
- Each group plans one improvement aimed at its failure point, within the budget it has left.
- Make the change. Write what was changed and why.
- Retest only the criterion the group improved, three trials, the same way as on Day 2.
- Record whether the result changed.
- Each group has about 2 minutes: show the failure point first, then the improvement and the retest result.
- Close by asking which designs worked even for someone not looking, and why that matters at a real crossing. Restate the rail safety rule: stay off tracks, cross only at marked crossings, and stop, look and listen.
Short on time? To finish in two 60-minute sessions, trim Ask, Imagine and Plan to about 10 minutes each so groups start building on the first day, then test, find the failure point, improve and retest on the second. Keep the improve-and-retest step and cut the share to a one-minute failure-first report per group.
Finished early? Write a short proposal to the park explaining which criterion your design meets best and what you would improve with 5 more track dollars.
Optional museum extension: During Ask, you can read the line from this guide that says it is a working railroad and asks families to teach kids to stop, look and listen at every crossing; it shows the design problem is a real one. Open the Southern California Railway Museum guide.
What to listen for
| If children say or do this | Try this |
|---|---|
| The best design is the one that looks coolest or uses the most materials. | Send the group back to the scoring chart: the best design is the one that meets the most criteria within the constraints. |
| A test is fair as long as we ran it three times. | Ask what else changed between trials: the observer, the distance, the timer? Only the design should change. |
| Our model failed, so our design is bad. | Every prototype has a failure point. Finding it is the point of testing; the improvement is what gets assessed. |
Safety: Rail safety: stay off tracks, cross only at marked crossings, and always stop, look and listen. This is a classroom model only: never test or demonstrate anything near real tracks. In class, keep scissors closed when carried, and if a group uses a bell, ring it only during a test.
Differentiation
Extra support
Limit the build to two criteria (seen from 3 meters, gate blocks the path) and provide a pre-cut gate arm and stand. Give a sketch frame with labeled parts: light, sign, gate, sound.
Multilingual learners
Teach criteria and constraints with two labeled bins: Must do and Limits. Provide frames: "Our design meets ___ because ___. It failed when ___. We improved it by ___." Assign clear group roles such as tester and timer. Key language use: Explain.
Extension
Add a constraint (a 10 track dollar budget) or a criterion (the warning starts when the toy train touches a trigger before the crossing) and redesign. Or write a short proposal to the museum explaining which design best meets the criteria and why.
Check for understanding
Success criterion: Defines the problem with criteria and constraints, compares two designs against them, carries out fair tests with controlled variables, and uses a failure point to improve the prototype.
| Level | What you see |
|---|---|
| 3Meets (level 3) | Writes a clear problem statement with at least three criteria and the three constraints, scores two designs and justifies the choice, records fair test results, names a failure point and explains how the retest changed. |
| 2Approaching (level 2) | Lists criteria and constraints and builds a working model, but the comparison is not justified, a test changed more than one variable, or the improvement is not retested. |
| 1Beginning (level 1) | Builds without a defined problem or criteria, does not compare designs, or tests without recording results. |
Family connection
Send home the half-page note in the printables. The text is below so you can paste it into a newsletter or app.
English
Over three days your child worked as an engineer. Starting from the railroad crossing painted in Rally Takes the Train, each group designed a model crossing that warns walkers, set criteria and a budget, compared two designs, built one, tested it fairly, found where it failed and improved it. Please review our rail safety rule together: stay off tracks, cross only at marked crossings, and stop, look and listen. For 5 minutes on your next walk, count the safety signs you see and talk about who each one helps.
Español
Durante tres días su hijo o hija trabajó como ingeniero o ingeniera. A partir del cruce de tren pintado en Rally Takes the Train, cada grupo diseñó un cruce en miniatura que avisa a quienes caminan, fijó criterios y un presupuesto, comparó dos diseños, construyó uno, lo probó de forma justa, encontró dónde fallaba y lo mejoró. Repasen juntos nuestra regla: no caminar en las vías, cruzar solo por los cruces marcados y siempre parar, mirar y escuchar. En su próximo paseo, por 5 minutos, cuenten las señales de seguridad y hablen de a quién ayuda cada una.
Teacher tips
- The budget is what makes this engineering instead of crafting. When a group wants more foil, ask what they will give up. That trade-off conversation is what 3-5-ETS1-2 is asking for.
- Have groups present where their model failed before what worked; it makes the improvement step feel normal rather than embarrassing.
Standards alignment
| Standard | Text |
|---|---|
| NGSS 3-5-ETS1-1 (opens in a new tab) | Define a simple design problem reflecting a need or a want that includes specified criteria for success and constraints on materials, time, or cost. |
| NGSS 3-5-ETS1-2 (opens in a new tab) | Generate and compare multiple possible solutions to a problem based on how well each is likely to meet the criteria and constraints of the problem. |
| NGSS 3-5-ETS1-3 (opens in a new tab) | Plan and carry out fair tests in which variables are controlled and failure points are considered to identify aspects of a model or prototype that can be improved. |
Check codes against your state's version of these standards. How we build and review lessons.
Teach it with the real book
4.9 stars on Amazon
Rally Takes the Train is a rhyming, hand-painted picture book about a corgi's first train ride, from the big station stairs to a dark tunnel to the people waiting at the end of the line. Children ask for it again and again, and every unit here opens with it.
Questions teachers ask
Why does the crossing challenge open with page 14?
Page 14 shows a railroad crossing, and for about 2 minutes students name every warning in the painting: flashing lights, the crossbuck sign, the red and white gate, RXR on the road. Then ask why a crossing needs so many warnings instead of one. That question leads straight into the criteria, especially being noticed by someone who is not looking.
What are the criteria and constraints for the model crossing?
Criteria: the warning is seen from 3 meters, front and side; it is noticed by someone not looking; the gate blocks the whole 8 cm path; and the gate goes down and up in 5 seconds, three times in a row. Constraints: supply table materials only, 20 minutes to build and 15 track dollars. Students copy both lists onto the Design Brief.
Why put a track dollar budget on a classroom model?
The budget is what turns the project from crafting into engineering. Craft sticks, index cards, string and paper cost $1, cups and foil $2, and a bell $4, so a group cannot simply add more of everything. When a group goes over, ask what they will give up rather than handing out more. That trade-off talk is what 3-5-ETS1-2 asks for.
Why must Design A and Design B be so different?
Comparing two solutions against the criteria only works if they really differ: sound against light, a swing gate against a drop gate. Each student sketches alone for 4 minutes, then the group combines ideas into two designs and scores each 0, 1 or 2 per criterion and on cost. Watch for one design drawn twice with a small change; send that group back to the sketches.
What should each table look like before Day 1?
Tape two parallel lines as a track with an 8 cm paper walking path across it, give each group a cardboard base, and tape floor marks 3 meters from the front and 3 meters from the side of every table. Stock one supply table with the priced materials. Set aside about 30 minutes for this, and keep the same groups and a labeled tray for all three sessions.
Should I build a sample gate to show the class?
Build one for yourself so you know how long 20 minutes of building feels, but do not show it. Students who see a teacher model tend to copy it, and then the two-design comparison and the scoring lose their purpose. If a group is stuck, point them back to their own sketches and the criteria list.
Who observes the tests, and why someone from another group?
Each group sends one member to observe for the group on its left, so nobody judges their own model and every model gets fresh eyes. The observer stands on the 3 meter marks for the visibility tests and faces away reading a card for the notice test. Distance, observer position and timer stay the same for every group; only the design changes.
A group's model failed a test. What now?
That is the expected result. Every prototype has a failure point, and finding it is the reason to test. At the end of Day 2, groups circle their worst test and write where or when the model stopped working. On Day 3 they make one change aimed at that point, within the budget left, and retest only that criterion three times. The check assesses the improvement, not a perfect first build.
Why do groups present the failure point before what worked?
Leading with the failure makes improvement feel normal rather than embarrassing, and it keeps the 2-minute presentations focused on evidence: what failed, what changed and what the retest showed. Close the share by asking which designs worked even for someone not looking, and why that matters at a real crossing, then restate the rail safety rule.
How does the energy lesson set up this challenge?
On Days 7 and 8 students found that a faster object has more energy, and that a fast, heavy train has a lot of energy to lose before it stops. A crossing has to warn people early for exactly that reason. Remind students of their ramp evidence during Ask, when they explain why a crossing needs several warnings.
Related lessons
Energy in Motion: Speed, Energy and Collisions
A two-session 4th grade 5E science sequence.
Build a Trestle: Design, Test and Compare Two Train Bridges
An engineering design challenge over two 45-minute sessions.
Gravity on the Grade: Which Way Does Gravity Pull a Train?
A two-session 5th grade science sequence for NGSS 5-PS2-1.
Teaching with Rally Takes the Train
Every lesson is free for classroom and homeschool use. Add the paperback to your classroom library, or review a lesson to earn a free copy if you are a credentialed teacher. Keep the journey going in about 650 free train museum guides, plan a visit with the field trip planner, or browse all lessons for educators.